Join me as we discover the amazing world of handmade crafts, all from within my antique serving buffet!
Tuesday, July 2, 2013
Thursday, April 25, 2013
Teenage Beach Bum Birthday Party Invitations
My daughter is celebrating her 14th birthday this year and it is the first year we will not have a swimming pool readily accessible to us during her birthday celebration.
So, we are bringing the beach to her this year.
She absolutely loves the colors aquamarine and light teal, so we will be incorporating a lot of shades of blue into her color decorations and edible selections!
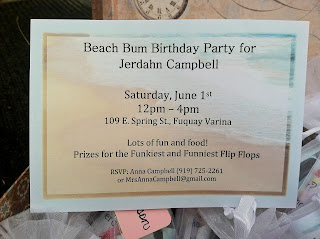
I loved all the beautiful invitations that are online, but something about the waves washing up onto the sand spoke to me! So, I put a text box over most of the image and used a white background color and made it partially transparent.
Then I added the text, centered and resized different portions so it was easier to read and everything would fit. Then I used this cool highlighter features for the outside edges of the background image, using a aquamarine color and fading it out.
 I really like knowing what the appropriate or expected attire is for an event that I am attending, so I figured a group of teenage girls would probably like to know as well.
And since our party isn't actually at the beach, I wanted to make sure they didn't show up in bathing suits. So I created this additional little piece to go with the invitation that just simply offers a fun suggestion for what they can wear to be comfortable.
For this template, I used an image of a really cute flip flop, created a text box with a white background and faded it out. Then I used a fun font for the text.
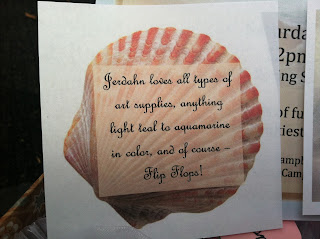
I noticed that one of my daughter's friends included a small list of things that the birthday girl loved, so guests had an idea of what to buy or make for her. I thought it was quite brilliant. So, I created this cute additional piece to the invite to showcase what my daughter loves to do and how even a simple pair of flip flops would be fun and appreciated. :) It is summer time after all.
For this template, I used an image of a shell for the background, added a text box with a orange background color and faded it out. Then I used a scribbly font to showcase the gift suggestions.
 I always love receiving gifts and gifts that have little surprises in them are even better!!! So, I used pretty organza bags to hold the invitation, added some cool shells my daughter collected from her visits to the local beaches in North Carolina (thought it was fitting).
Then I rolled up the large party invite around a pretty shell and tied it with a bow and placed it in the bag. Then I rolled up the flip flop invite around a smarty and tied it with a bow and inserted it into the bag. Then I rolled up the last shell invite and tied with a bow.
I didn't add sand because that would be messy with this type of bag, even then if you take out the rolled up invites after they have been sitting in sand.. yuck. Then you would have sand everyone.
Then I punched out little tags and included a decorated tag on the bottom and a plain tag on the top for the guest name, tied the organza bag string and voila!
I am more than happy to share this template with you, I just haven't figured out how to add word documents to blogger yet... Let me know if you would like the templates I created here and I will email them to you!
I have already started collecting items for the actual party... I will show you those in my next blog post! :)
What type of accessories are you going to include in your birthday party invitations?
So, we are bringing the beach to her this year.
She absolutely loves the colors aquamarine and light teal, so we will be incorporating a lot of shades of blue into her color decorations and edible selections!
I loved all the beautiful invitations that are online, but something about the waves washing up onto the sand spoke to me! So, I put a text box over most of the image and used a white background color and made it partially transparent.
Then I added the text, centered and resized different portions so it was easier to read and everything would fit. Then I used this cool highlighter features for the outside edges of the background image, using a aquamarine color and fading it out.
 I really like knowing what the appropriate or expected attire is for an event that I am attending, so I figured a group of teenage girls would probably like to know as well.
And since our party isn't actually at the beach, I wanted to make sure they didn't show up in bathing suits. So I created this additional little piece to go with the invitation that just simply offers a fun suggestion for what they can wear to be comfortable.
For this template, I used an image of a really cute flip flop, created a text box with a white background and faded it out. Then I used a fun font for the text.
I noticed that one of my daughter's friends included a small list of things that the birthday girl loved, so guests had an idea of what to buy or make for her. I thought it was quite brilliant. So, I created this cute additional piece to the invite to showcase what my daughter loves to do and how even a simple pair of flip flops would be fun and appreciated. :) It is summer time after all.
For this template, I used an image of a shell for the background, added a text box with a orange background color and faded it out. Then I used a scribbly font to showcase the gift suggestions.
 I always love receiving gifts and gifts that have little surprises in them are even better!!! So, I used pretty organza bags to hold the invitation, added some cool shells my daughter collected from her visits to the local beaches in North Carolina (thought it was fitting).
Then I rolled up the large party invite around a pretty shell and tied it with a bow and placed it in the bag. Then I rolled up the flip flop invite around a smarty and tied it with a bow and inserted it into the bag. Then I rolled up the last shell invite and tied with a bow.
I didn't add sand because that would be messy with this type of bag, even then if you take out the rolled up invites after they have been sitting in sand.. yuck. Then you would have sand everyone.
Then I punched out little tags and included a decorated tag on the bottom and a plain tag on the top for the guest name, tied the organza bag string and voila!
I am more than happy to share this template with you, I just haven't figured out how to add word documents to blogger yet... Let me know if you would like the templates I created here and I will email them to you!
I have already started collecting items for the actual party... I will show you those in my next blog post! :)
What type of accessories are you going to include in your birthday party invitations?
Sunday, March 10, 2013
Easy to make Friendship Cards at Annabelle's Craft Room
While visiting our local craft store (A.C. Moore and Michael's) we found a really cute blank stationary set with pink trim on sale for only $0.99! I always grab up deals like that, because I will find a way to use them.
 At home, I set up 2 sets of stamps from Stampin' Up!, a stamp pad from the craft store, a corner punch from Creative Memories and my card set. I was able to create this cute set of cards that will be useful for almost any occassion! Plus, this size of card is regular postage. Something I have learned is to not jump for the oversized cards/enevelopes. The postage can take your breathe away!
Always keep your eyes open and get ready to be creative!
 Then for a very simple, yet fun card I set out 1 stamp from Stampin' Up!, a stamp pad from the craft store, a corner punch from Creative Memories and my card set. Thse are perfect for springtime, welcoming new friends, and a general sunshine message.
Did you find an amazing deal at your local craft store and make something creative? Share your photos with us, we would love to feature you! Email your photos to: mrsannacampbell@gmail.com.
 At home, I set up 2 sets of stamps from Stampin' Up!, a stamp pad from the craft store, a corner punch from Creative Memories and my card set. I was able to create this cute set of cards that will be useful for almost any occassion! Plus, this size of card is regular postage. Something I have learned is to not jump for the oversized cards/enevelopes. The postage can take your breathe away!
Always keep your eyes open and get ready to be creative!
 Then for a very simple, yet fun card I set out 1 stamp from Stampin' Up!, a stamp pad from the craft store, a corner punch from Creative Memories and my card set. Thse are perfect for springtime, welcoming new friends, and a general sunshine message.
Did you find an amazing deal at your local craft store and make something creative? Share your photos with us, we would love to feature you! Email your photos to: mrsannacampbell@gmail.com.
Sunday, March 3, 2013
New Craft Toy: Scalloped Gift Tag Paper Punch
 My newest craft toy is a scalloped gift tag paper punch that cuts 3 different size tags at the same time! This beauty was purchased at A.C. Moore with a 40% off coupon. I just love buying new craft toys and getting them at a discount!
I had been eyeing this tag cutter for a little while and finally decided it was time to stop handcutting my tags and get a nice easy punch to do it for me!
These tags are so useful for adding dimentions to greeting cards, gift boxes and presents. I love using tags on my presents, it gives a personal touch when someone can see their name on a present. They know it was picked and meant just for them!
Have you found a new crafting toy? Email your photos to Anna Campbell, we would love to feature them!
Saturday, March 2, 2013
Handmade Soy Paraffin Palm and Beeswax Candle Suppliers
 We will be discovering the world of handmade candles together! Whether you are interested in soy, paraffin, palm, or beeswax this is going to be a very fun and rewarding adventure!
I will be sharing tips and ideas from candle makers all over the world who are using all different types of wax, containers, and procedures. For you see, each candle maker is their own inventor, chemist, and designer!
Today, I will show you picture of different candle providers, so you can see what tools are available for you to use!
Many candle making beginners start out using supplies from their local Michaels, Hobby Lobby, or A/C/ Moore craft supply store.
Once they catch the candle making bug, they go looking for the suppliers!
United States
Nature's Garden http://www.naturesgardencandles.com/
Peak Candle Making Supplies http://www.peakcandle.com/
Just Scent http://www.justscent.com/
Bittercreek Candle Supply http://www.bittercreek.com/
Houston Candle Supply http://www.houstoncandlesupply.com/
CandleScience http://www.candlescience.com/
Candle Cacoon http://absyf.statk.servertrust.com/Default.asp
Day Star Candle & Soap Supplies http://www.daystarsupplies.com/
Australia
Natural Candle Supply http://www.naturalcandlesupply.com.au/#Candle-Making
UK
Sensory Perfection http://www.sensoryperfection.co.uk/
Are you using a supplier, that you absolutely love! Let us know by adding their business name and url below in our comment section. Thank you!
Thursday, February 28, 2013
Annabelle's Craft Room
 We recently moved to North Carolina and our house is a bit smaller than we had before and my husband is now working primarily out of the house.
 Since our 3 bedrooms were all taken up, I moved all of my candle making supplies and art supplies into our one car garage. Well, it gets a little colder here in North Carolina then what I am used to, so I haven't been spending much time in the garage. The only space left for me was our dining room table.
Let me tell you, with a husband that loves clean and orderly and a teenager that really doesn't care, and me.. the crafty person that would LOVE to be organized by just can't seem to get it all together, since I kind of feel like I am a wandering around from garage to dining room table to garage... I couldn't catch a break.
I started doing research. How do people have a "space" when they don't have a "space". It seemed ridiculous at first... but then I started finding the most amazing things! While in Barnes and Noble the other day I found a magazine (Storage by Better Homes and Gardens) focusing on creative crafting spaces!
Crafters were converting closets, room corners and more into their crafting "spaces"! I was so excited!! Then I realised... I don't have a closet that I could use. So, on I went garage to dining room table back to garage, the gypsy crafter.
Well, I am proud to tell you, not anymore! I am Queen of the dining room table and proud to say that I have found my crafting "space"!
In our dining room we have this antique serving buffet that is filled with my china, fancy serving dishes and random odds and ends. While sitting at our dining room table, I started eyeing our serving buffet with lust and then "BING" went an idea!
If they can use a closet, I can use a serving buffet! So, I moved all of the items from our serving buffet into the kitchen and in went all of my crafting supplies, papers, glue sticks, stamps, bits and pieces!
I have a home... a crafty home. Craft gypsy no more, and so excited to start creating!
Have you created your own craft room? Send your photos to Anna Campbell. We would love to feature them!
Subscribe to:
Comments (Atom)


